Android SDK
1. 准备工作
Section titled “1. 准备工作”- 在 FlareLane 控制台注册并创建一个项目。
2. 设置凭据
Section titled “2. 设置凭据”请按照以下指南输入 FlareLane 发送推送通知所需的凭据。
3. 通过 Gradle 集成 SDK
Section titled “3. 通过 Gradle 集成 SDK”dependencyResolutionManagement { repositories { // Add the line below maven("https://jitpack.io") }}dependencyResolutionManagement { repositories { // Add the line below maven { url 'https://jitpack.io' } }}allprojects { repositories { // Add the line below maven { url 'https://jitpack.io' } }}将以下内容添加到您的应用级 build.gradle(<project>/<app>/build.gradle)中。
dependencies { // Add the line below implementation("com.github.flarelane:flarelane-android-sdk:1.10.0")}dependencies { // Add the line below implementation 'com.github.flarelane:flarelane-android-sdk:1.10.0'}4. 添加初始化代码
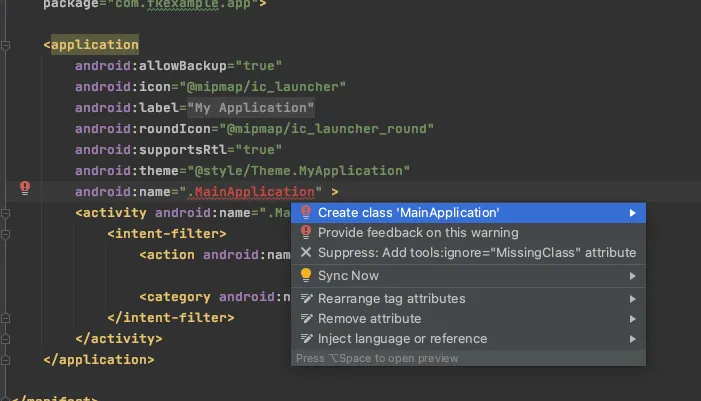
Section titled “4. 添加初始化代码”在您的 AndroidManifest.xml 文件中设置 android.name=".MainApplication",然后使用编辑器的快速修复功能创建 MainApplication 类文件。您也可以手动创建该类文件。
在 onCreate 方法内添加 FlareLane.initWithContext 函数。您可以在控制台的 [项目] 页面找到您的项目 ID。
import com.flarelane.FlareLane
class MainApplication : Application() {    override fun onCreate() {        super.onCreate()
        // Add the code below        // To control when the notification permission prompt appears, set the third parameter to false and call .subscribe() at the appropriate time.        FlareLane.initWithContext(this, "PROJECT_ID", true)    }}
import com.flarelane.FlareLane;
public class MainApplication extends Application { @Override public void onCreate() { super.onCreate();
// Add the code below // To control when the notification permission prompt appears, set the third parameter to false and call .subscribe() at the appropriate time. FlareLane.initWithContext(this, "PROJECT_ID", true); }}5. 关联用户 ID
Section titled “5. 关联用户 ID”应用安装后,FlareLane 中创建的设备是「匿名设备」。通过关联您单独管理的唯一用户 ID,您可以将 FlareLane 的设备与您自己的用户 ID 进行匹配。
关联用户 ID 有诸多好处。 它可以让您区分会员与非会员,并随时按用户 ID 发送推送通知,因此我们建议您在集成早期就完成设置。
通常情况下,您可以在用户注册或成功登录时,通过 setUserId 函数关联用户 ID。
FlareLane.setUserId(this, "USER_ID")FlareLane.setUserId(this, "USER_ID");6. 其他集成指南
Section titled “6. 其他集成指南”基于 WebView 的应用的桥接集成
Section titled “基于 WebView 的应用的桥接集成”- FlareLane 为基于 WebView 的应用提供了多种便利功能,让网站上执行的操作也能在应用中被识别。请参阅基于 WebView 的移动应用桥接指南。
自动 URL 处理
Section titled “自动 URL 处理”- 默认情况下,FlareLane 会在点击推送通知时自动处理 https 链接和深度链接等 URL。 如果您需要实现自己的点击处理逻辑,请参阅禁用自动 URL 处理。
显示应用内消息(弹窗)
Section titled “显示应用内消息(弹窗)”- 请参阅应用内消息(弹窗),并在您希望弹窗出现的位置添加一行代码(displayInApp)。
设置通知颜色
Section titled “设置通知颜色”<resources> <!-- Change the notification color --> <string name="flarelane_notification_accent_color">#BC0000</string></resources>设置通知渠道
Section titled “设置通知渠道”- 请参阅 Android:设置通知渠道,配置适合您服务的 Android 通知渠道。
设置通知图标
Section titled “设置通知图标”- 请参阅 Android:设置通知图标,设置您的图标资源。
| 指南 |
|---|
| 移动 SDK 参考文档 |
| Android SDK 版本说明 |